Staging of product
A lot of paver projects will differ depending on gain access to, website conditions, project size and obviously, the weather condition. These situations can have a general influence on your task from a timing stand point. Cautious factor to consider needs to be taken to identify the time to begin the paver installation. Always attempt to reduce or prevent any traffic on the prepared locations.
The foreman or task manager ought to constantly have the materials (sand/ pavers) dispersed around the project website for easy and effective setups. Paver pallets/bundles ought to be positioned in a manner not to disrupt the paver installation. The correct pallet/bundle placement can make the actual task installation easier and quicker by minimizing the total labor of handling the product.
Brick paver patterns
Pavers can be put in several patterns depending on their shape. Each paver shape will normally have several different hatch patterns that are supplied by the manufacturer.
Contractors need to take into factor to consider the traffic weight loads on their paver projects. In a lot of applications around the world, it has been shown that pavers laid in a herringbone pattern have actually performed sufficiently.
Pavers that are 60 mm (2 - 3/8 in) density are suitable for pedestrian applications. Pavers that are going to be utilized in commercial or commercial applications must be 80 mm (3 - 1/8 in) in density.
Reference/starting point for brick paver installation
There are a number of conditions that determine the beginning point of a paver task.
When beginning to install pavers it is best to snap a true straight chalk line on the surface of the bed linen sand or pull a real straight string line above the surface area of the bed linen sand at the completed elevation of the pavers This will help as a guide for keeping straight joint lines and will likewise permit the installer to make adjustments in the alignment of the pavers.
Structures and concrete curbing are generally not straight and should not be used for developing straight joint lines. Making use of string lines is essential to identify the true straightness of the edge too. As the paver installation progresses, the string lines will assist decrease the need for small trim pieces.
Joint width between pavers must be in between 1/16 and 3/16 in (2 and 5 mm ). There are some pavers with spacer bars on their sides. These will keep a minimum joint width and enable the bedding and jointing sand to get in in between each paver. Pavers with spacer bars are generally not laid in snug against each other because a string line will offer constant joint spacing.
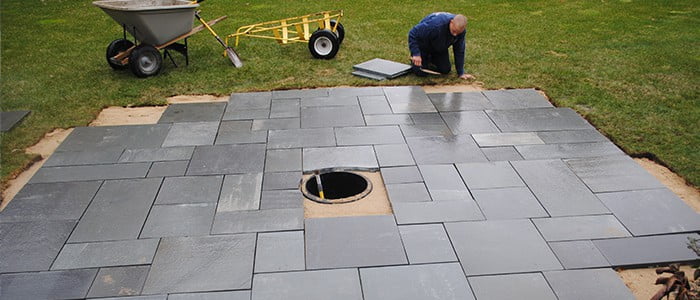
Installation of brick pavers.
One of the most extensively utilized approaches for the installation of pavers is hand installation of each paver. It is best to set up a single row of pavers along one of the real straight lines that you have actually pulled or above the bedding sand. The finest technique is to put a paver versus another one and let it move down into the bed linen sand.
When setting up pavers on a steep grade, they must be set up at the base of the grade going uphill. This will avoid the pavers from creeping as they are being laid.
On large industrial and industrial applications, hand laying pavers would not be cost effective due to the labor intensity. The best way for installing pavers on large projects is to install them mechanically. The use of a mechanical laying machine can install approximately 6000 - 7000 sq ft a day. There are a couple items a specialist need to think about prior to setting up pavers mechanically:
1.) Mechanical installers are only capable of installing pavers in certain patterns.
2.) The contractor must make sure that the manufacturer can production and bundling pavers in the wanted pattern on the pallets for simple mechanical installation.
3.) Professionals may experience a color blending situation coming off the bundles of pavers Poor color mixing might lead to an irregular looking installation. A lot of producers are consistent with color mixing on each package of pavers, but it is the contractor's responsibility to ensure correct mixing in the field.
Cutting procedures for brick pavers.
Specialists normally have 2 ways of cutting pavers. Pavers are cut either by 1). A double bladed guillotine or by 2). A gas powered cut off saw or brick saw which is equipped with a diamond blade. The diamond blade cut-off saw or brick saw will supply a much cleaner and more precise cut. Many brick saws will have a hose pipe attachment on them which will permit the operator to cut the pavers damp. When cutting pavers wet, it will help decrease dust and will prolong the diamond blades life too. The operator of the brick saw must always cut the pavers far from the surface area of the paver field when cutting damp, due to the fact that the pavers will develop a slurry that will stain the paver surface area. Pavers that are cut ought to not fit tight, enough spacing needs to be offered for jointing sand.
The brick saw operator must always use the appropriate protection that is required for operating a saw, such as eye, ear, breathing and hand security ).
Edging types
Edge restraints play a major function in the general success of an interlocking pavement installation Edging restraints eliminate lateral motion of the pavers and hold the pavers securely together. Especially at the external boundary of the paver application, without an edging restraint, your project is ensured to stop working over time.
Typically made edge restraints are the most frequently used by specialists. Produced edging restraints can vary from, plastic edging, steel and aluminum, woods or precast concrete and stone.
Edging installation.
This could result in the migration of the bed linen sand and eventual lateral motion of the pavers. If there is a possibility of losing bedding sand between the pavers and the edge restraint, then geo textile material is recommended. When a space in between the pavers and the edging exceeds 3/8" (10mm), then the area should be filled with cut pavers.
Compaction of brick pavers.
After installation, the pavers need to be compressed. The entire location that is to be compressed ought to be swept tidy of any foreign objects and debris that can trigger scratching or scuffing on the surface of the pavers.
In addition, it is important that the very first compaction takes location before any jointing sand has been used to the pavers. If jointing sand is used to the pavers prior to compaction takes location, this can cause a bridging problem and will not permit the joints to be completely filled with jointing sand. This can also avoid the pavers from being effectively set into the bedding sand.
When compacting the pavers, it Koi Pond Florida is advised that you make a minimum of two passes in different instructions throughout the pavers. This will allow the pavers to be appropriately embeded in the bed linen sand and will force the bedding sand up into the joints from the bottom of the pavers.
The compaction of the pavers is really critical to the final efficiency of the pavers. Failure to do proper compaction can result in contortions and pavement failure gradually.
Paver pallets/bundles should be put in a way not to interfere with the paver installation. One of the most commonly utilized approaches for the installation of pavers is hand installation of each paver. The operator of the brick saw should always cut the pavers away from the surface area of the paver field when cutting damp, due to the reality that the pavers will create a slurry that will stain the paver surface. Edging restraints get rid of lateral motion of the pavers and hold the pavers securely together. When a gap between the pavers and the edging exceeds 3/8" (10mm), then the space must be filled with cut pavers.